Thursday, February 28, 2019

Factory Restore iPhone 8 on iOS 12 via iPhone Setting


Factory Restore iPhone 8 on iOS 12 via iPhone Setting


iPhone 8 iOS 12 can be reverted back to the way it was when it first came out of the box (i.e. wipe all contents, settings and personal information from the device) through iPhone Settings app. This method is recommended when you have your iPhone in good shape and form with all passcodes and IDs intact.


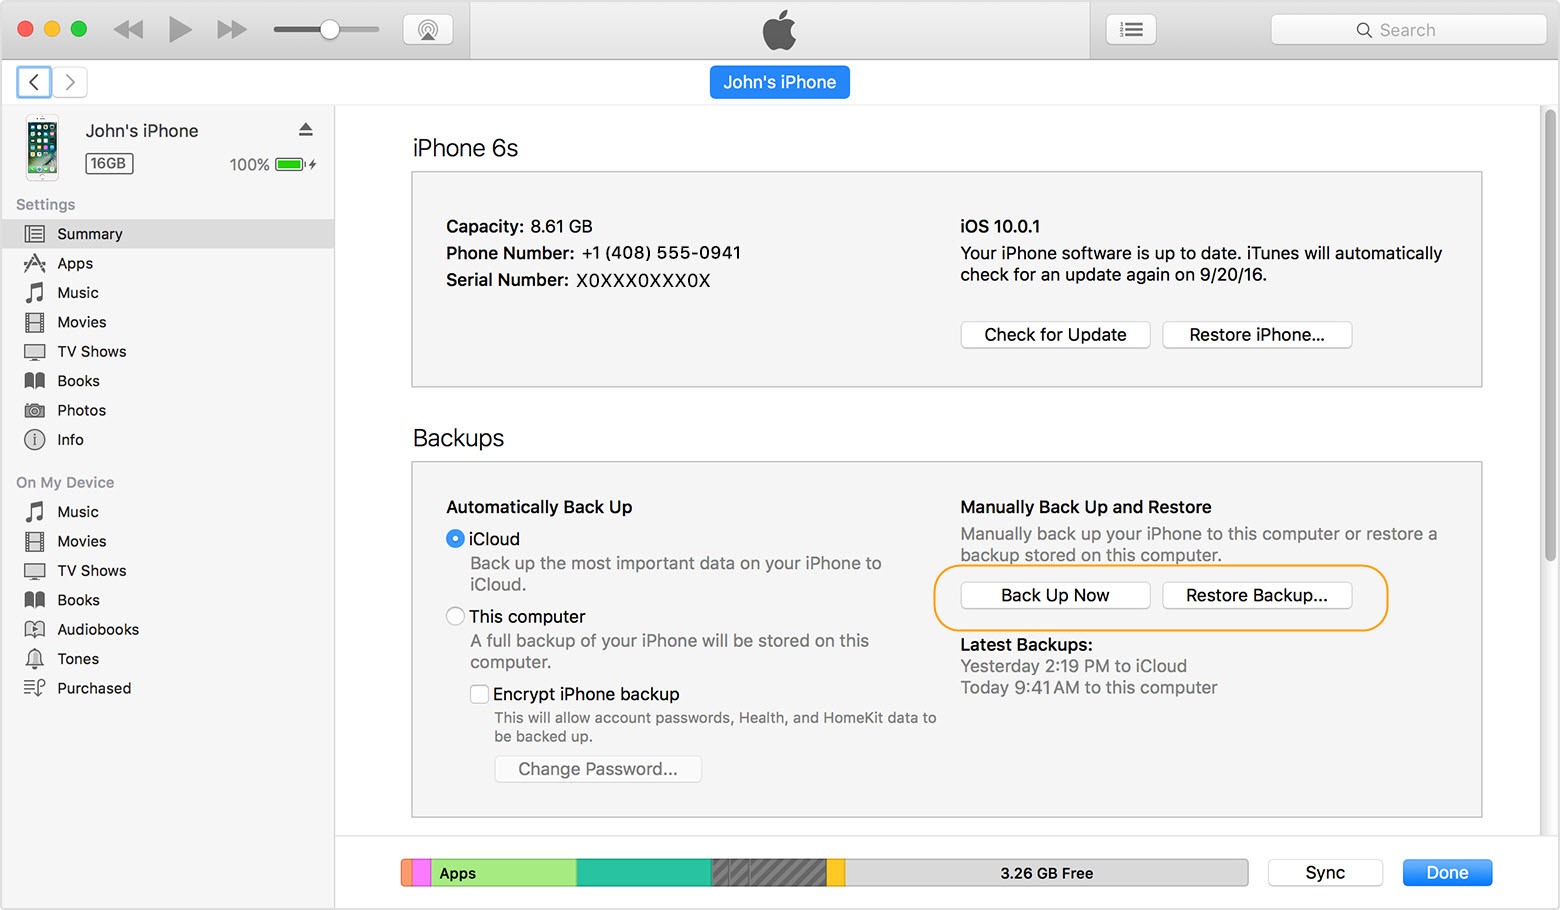
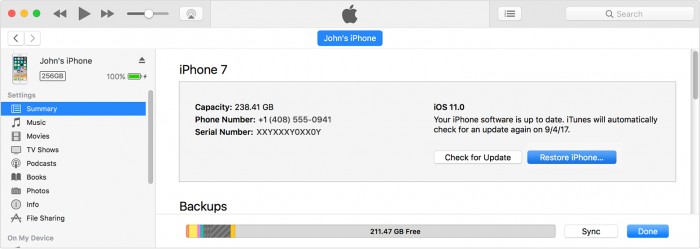
Hence, if you don’t have your iPhone passcode, then this method of factory resetting an iPhone 8 is not for you. Please, make sure that you have a complete backup of your iPhone on iTunes or iCloud before following the steps about how to factory reset iPhone 8.


Sponsor ads:8 Best PDF Reader & Editor Apps for iPhone and iPad in 2019
Sponsor ads:How to Access and Unlock Android Phone with Broken Screen
Sponsor ads:How to Remove Duplicate Contacts on iPhone and Android Quickly
Sponsor ads:How to Download & Save YouTube Videos to iPhone’s Camera Roll Sponsor ads:Best 2 Free Methods to Fix Slow USB Transfer Speeds


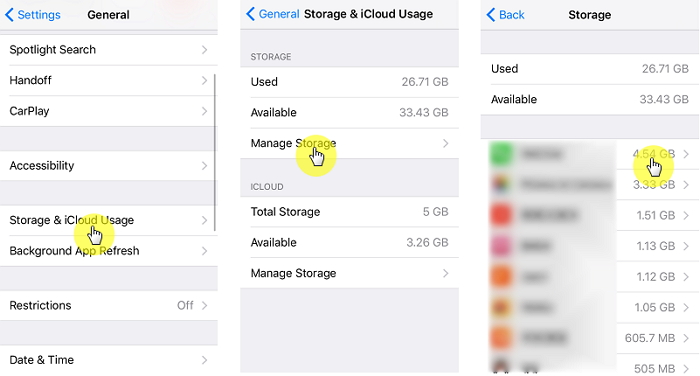
Here are the steps to perform a factory reset of your iPhone 8 through the iOS Setting app.


Go to your iPhone 8 Settings app and click on it to launch it.


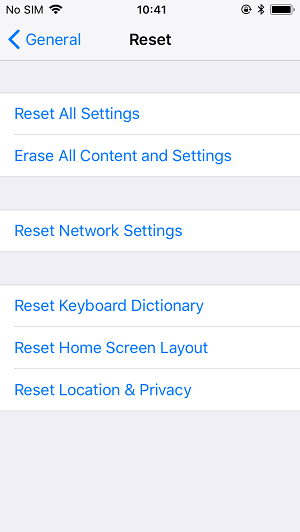
Tap “General > Reset > Erase All Contents and Settings”.


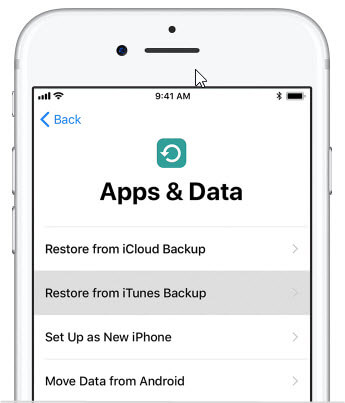
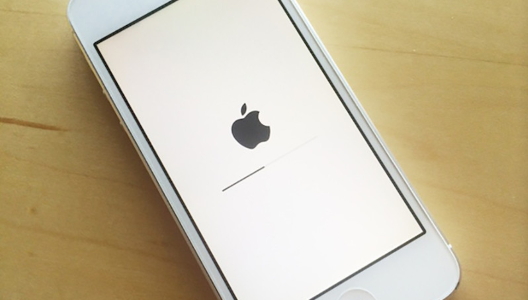
iPhone will ask you to input your Apple passcode, then the erasing process will begin. After erasing your iPhone to factory settings, you can choose either to restore your iPhone data from an iCloud backup or set up your iPhone 8 as a new device.


How to Reset iPhone 8 by iTunes


You can easily factory reset your iPhone 8 iOS 12 with iTunes instead of using the second method above. Here is some situation when iTunes recovery mode method of factory reset is better than resetting via settings:


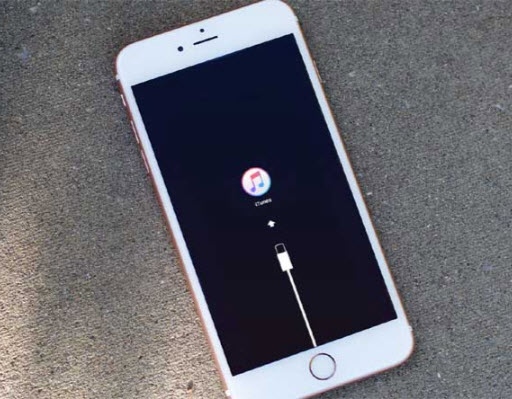
Recovery mode works when iTunes cannot recognize your iPhone 8 or says that your iPhone 8 is in recovery mode.


If your Screen is stuck on Apple logo with no progress bar.


If iPhone 8 is saying “connect to iTunes”.


Here are the steps to factory reset your iPhone 8/8 Plus/X via iTunes:


Connect your iPhone 8, 8 Plus, or X to your computer via USB cable.


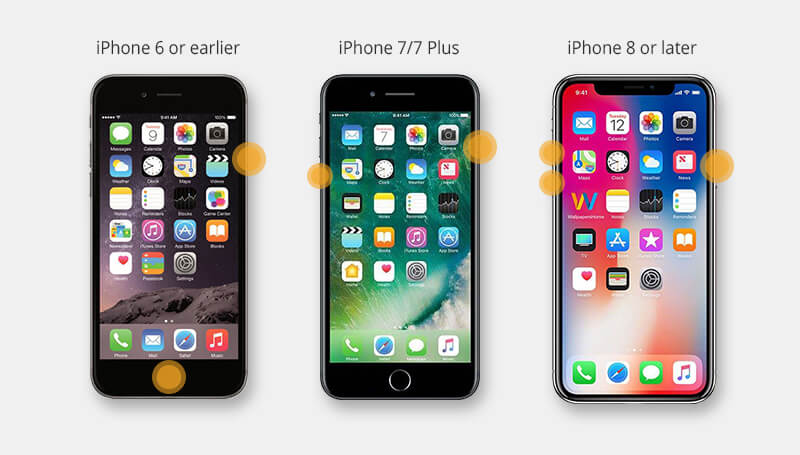
Force restarts your iPhone with these steps: Press and quickly release the Volume Up button > Press and quickly release the Volume Down button > Press and hold the side button until connect to iTunes screen appears.


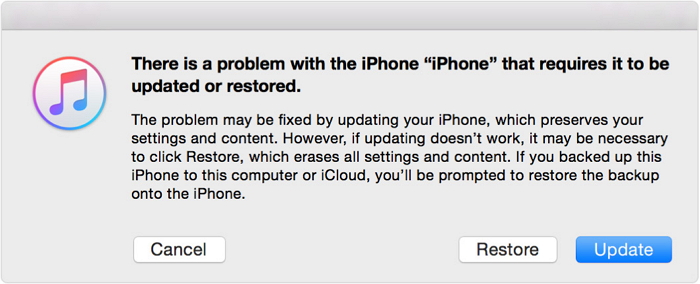
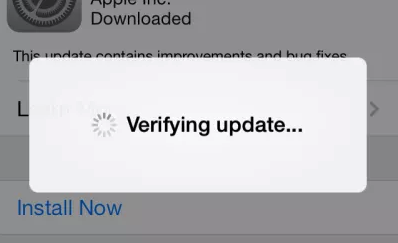
Choose “Update” and iTunes will download the software for your device. Set up your device at the end.
Sponsor ads:5 Best Photo Resizer Apps for Android 2019
Sponsor ads:Best 6 Photo Organizer – Photo Organizing Software for Windows & Mac

Sponsor ads:10 Best Translation App for iPhone or iPad in 2019


Sponsor ads:


Sponsor ads:10 Best Offline Navigation Maps Apps for iPhone and iPad in 2019
Sponsor ads:Top 6 Anonymous Messaging Apps for iPhone: What You Need to Know? Sponsor ads:How to Fix Android File Transfer Not Working Error and Its Best Alternatives


Gihosoft Free iPhone Data Recovery:https://www.gihosoft.com/iphone-data-recovery-free.html


Gihosoft iPhone Data Recovery Free


Free iPhone Data Recovery Software for Windows/Mac


Recover up to 12+ types of files, including contacts, SMS, photos, WhatsApp, Viber, notes, etc.


Restore lost data from iOS devices directly or from iTunes and iCloud backup


Recover iPhone data lost due to iOS upgrade/jailbreak, accidental deletion, device lost or broken


Support all the latest iPhone, iPad and iPod Touch


Both Free and Pro version.


If you lost data after you updated to a new iPhone, you can always use Gihosoft iPhone Data Recovery to get the data back from the old iPhone or backup.You may also like: iphonerecovery.com


If you use android phones, please choose Gihosoft Android Data Recovery.


With Gihosoft Android Data Recovery, no longer afraid of data loss!


Must read:Youtube video downloader for pc


Gihosoft RePicvid Free Photo Recovery Software provides a free photo recovery software for windows to help users recover the deleted or lost photo for free.


Jihosoft Android Data Recovery: the best Android Data Recovery software for Windows and Mac to recover deleted contacts, messages, photos, videos, WhatsApp and etc from Android devices.Tips:How to transfer messages from iPhone to iPhone


jihosoft Free iPhone Data Recovery

How to Set Video Ringtone on Jailbroken iPhone?


We’re among the large population of iPhone users who have the opinion that it’s unexciting to see a contact name on iPhone screen when receiving a notification of an incoming call. We believe it would be more interesting if you can set video ringtone for iPhone so that you know who is calling by hearing the ringtone and seeing a video playing on the screen when receiving a notification of an incoming call.

To share on knowledge with you on how to make your own free video ringtone for iPhone, we shall be discussing how to use a Cydia tweak/app: Vuziq to create video ringtones for jailbroken iPhone. We shall also be discussing how to convert video soundtracks to ringtones for iPhone and set them as ringtones on non-jailbroken iPhone.


Part 1: How to Set Video Ringtone on Jailbroken iPhone?


Part 2: How to Convert Video Soundtrack to iPhone Ringtone?
Part 1: How to Set Video Ringtone on Jailbroken iPhone?

Well, gone are the days when you can only play default ringtones on iPhone. Nowadays, instead of seeing static pictures and caller’s name on your screen, you can choose to make incoming calls more fun by setting a music video from your favorite artist as your iPhone ringtone.

Vuziq is a Cydia tweak/app that can help you set video ringtone on iPhone. It can be used to search and download fun and favorite music videos and set them up as iPhone video ringtone. More so, the ability to set up a video ringtone on a jailbroken iPhone is the feature that’s making Vuziq Cydia app popular among iOS device users.

Before you can use Vuziq to download Video ringtones on iPhone, you have to go through a registration process. Once you are registered, you will be entitled to use the app in searching and downloading videos of your choice. All downloaded videos can be set specifically for individual contacts.

Here are the steps to setup Vuziq and use it to search and download iPhone Video ringtones.


Simply open Cydia and switch it on. Then search for Vuziq and install it on your iPhone.


Restart your device so that the tweak will work properly.


Click Settings, Scroll down to Tweak Preferences and select Vuziq.


Open the app from the application list on your SpringBoard. Search for your favorite music videos from the Download tab.


Click on the video you wish to download, then the page with "Download & Video Stream" will open, choose "Download".


Navigate to the Video Calls tab, and click the switch next to the video you just downloaded to set it as default video ringtone.


Set the start and finish points on the video, and click the Save button.


Disadvantages of Using Vuziq:


Vuziq is only compatible with iOS 5 and earlier versions, but not compatible with latest versions of iOS.


Since it’s a Cydia tweak, you’ll need to jailbreak your iPhone before installing this tweak.


There is always a delay between when you pick your call and when you get to hear the caller’s voice on the line.


Sponsor ads:


Gihosoft Free iPhone Data Recovery:https://www.gihosoft.com/iphone-data-recovery-free.html


Gihosoft iPhone Data Recovery Free


Free iPhone Data Recovery Software for Windows/Mac


Recover up to 12+ types of files, including contacts, SMS, photos, WhatsApp, Viber, notes, etc.


Restore lost data from iOS devices directly or from iTunes and iCloud backup


Recover iPhone data lost due to iOS upgrade/jailbreak, accidental deletion, device lost or broken


Support all the latest iPhone, iPad and iPod Touch


Both Free and Pro version.


If you lost data after you updated to a new iPhone, you can always use Gihosoft iPhone Data Recovery to get the data back from the old iPhone or backup.You may also like: iphonerecovery.com


If you use android phones, please choose Gihosoft Android Data Recovery.


With Gihosoft Android Data Recovery, no longer afraid of data loss!


Must read:Youtube video downloader for pc


Gihosoft RePicvid Free Photo Recovery Software provides a free photo recovery software for windows to help users recover the deleted or lost photo for free.


Jihosoft Android Data Recovery: the best Android Data Recovery software for Windows and Mac to recover deleted contacts, messages, photos, videos, WhatsApp and etc from Android devices.Tips:How to transfer messages from iPhone to iPhone


jihosoft Free iPhone Data Recovery

Wednesday, February 27, 2019

How to Make a Song a Ringtone on iPhone 6 without Computer?


How to Make a Song a Ringtone on iPhone 6 without Computer?

In the first part, we'll be making use of one of Apple’s featured apps for iOS and Mac OS X called GarageBand. GarageBand is paid software, but was later made free for iOS for those who purchased new iOS devices after 1st October, 2013. Follow the steps below for how to make a song a ringtone on iPhone 6 without computer using GarageBand.

Step 1.Normally, your iPhone 6 will have GarageBand installed. If not, you can download and install GarageBand on your iPhone 6. Launch the GarageBand app on your iPhone.


Step 2.Select a song from your iPhone. Tap the + button in the toolbar, and then tap the Loops button in the top right toolbar. Then select the audio source, most likely "Music" to pick from the iPhone Music Library. (You can pick Audio Files and source an audio clip straight from iCloud Drive).


Step 3.After song is selected, it will appear on the row. You should use the trimming and split editing features of GarageBand to select the part of the song you want to hear. Up to 30 seconds duration is allowed.


Step 4.Save ringtone. Back to "My Songs" picker, find your song in the Recents tray. Long-press on it to reveal contextual menu options. Tap Share. Then tap Ringtone. You can name the ringtone whatever you want. Then tap Export.


Step 5.A "Ringtone Export Successful" message box will pop up. Click on "Use sound as" to choose from Standard Ringtone, Standard Text Tone, or Assign to Contact to successfully set your song as ringtone on your iPhone.


Sponsor ads:View & Share Saved WiFi Password on iPhone Xs Max/X/8/7/6s
Sponsor ads:Top 7 Best Free DVD Burner for Mac You Should Know | 2019 Edition

How to Fix ” We Could Not Complete your iTunes Store Request”

How to Fix ” We Could Not Complete your iTunes Store Request”

“Every time I try to buy a song or update my iPhone apps, I keep getting an error message saying “We could not complete your iTunes store request. The iTunes Store is temporarily unavailable. Please try again later.” I have the latest version of iTunes and last week, I changed my iTunes password. Now I get this error every time. Does anyone know what it means or how to fix it?”

These iTunes errors are nothing new and although not much is known about what causes them, their solutions can often be simple. In this article, we provide you with an effective solution to this particular problem. Read on to find out what you can do. We’ve divided the individual solutions for Mac and Windows users because the processes are not the same. Choose your solution depending on the platform you use.
How to Solve this Problem for Windows Users

If you are experiencing this error message and you are using iTunes on a Windows System, follow these instructions to fix it.

Step 1: Quit iTunes and Safari if you have the browser on your Windows computer.

Step 2: Open Windows Explorer.

Step 3: In the upper bar of the Windows Explorer, under Organize, choose “Folder and Search Options.”

Step 4: in the “View” tab, ensure that “Show Hidden files, folders and drives” is checked and then click OK.

Step 5: Go to C:\Users\YourUserName\AppData\Roaming\Apple Computer\iTunes\Cookies or YourUserName\AppData\Roaming\Apple Computer\iTunes\Cookies and delete everything in the folder.

Step 6: Now launch iTunes and connect to your iTunes account.

This should eliminate the problem and allow you to purchase or download apps all over again. Check more informations here.
How to Solve the Problem for Mac Users

If you are using a Mac instead, here’s how to go about solving the problem.

Step 1: Sign off on the Mac App Store and iTunes but leave the Mac App Store open.

Step 2: Quit iTunes and iBooks if they are running.

Step 3: Now, open Safari and go to Preferences/ Privacy.

Step 4: Choose to Block cookies “Always”.

Step 5: Click on “details” under “Remove all website data…”

Step 6: Search for “apple.com” and click on it when it appears in the search results, click “Remove” and then click “Done.”

Step 7: Now quit Safari and open Activity Monitor. In Activity Monitor, search for “storeagent.” (You may find it as ibookstoreagent.)

Step 8: Select all of them and force quit (you can do that sing the “X” in the toolbar if you are using Mavericks.)

Step 9: In Finder, go to ~/Library /Cookies and delete everything in that folder. Empty the trash.

Now go back to the iTunes store or the Mac App Store and you should be able to sign in now. Check more informations here. Sponsor ads:

Gihosoft Free iPhone Data Recovery:https://www.gihosoft.com/iphone-data-recovery-free.html

Gihosoft iPhone Data Recovery Free

Free iPhone Data Recovery Software for Windows/Mac

Recover up to 12+ types of files, including contacts, SMS, photos, WhatsApp, Viber, notes, etc.

Restore lost data from iOS devices directly or from iTunes and iCloud backup

Recover iPhone data lost due to iOS upgrade/jailbreak, accidental deletion, device lost or broken

Support all the latest iPhone, iPad and iPod Touch

Both Free and Pro version.

If you lost data after you updated to a new iPhone, you can always use Gihosoft iPhone Data Recovery to get the data back from the old iPhone or backup.You may also like: iphonerecovery.com

If you use android phones, please choose Gihosoft Android Data Recovery.

With Gihosoft Android Data Recovery, no longer afraid of data loss!

Must read:Youtube video downloader for pc

Gihosoft RePicvid Free Photo Recovery Software provides a free photo recovery software for windows to help users recover the deleted or lost photo for free.

Jihosoft Android Data Recovery: the best Android Data Recovery software for Windows and Mac to recover deleted contacts, messages, photos, videos, WhatsApp and etc from Android devices.Tips:How to transfer messages from iPhone to iPhone

jihosoft Free iPhone Data Recovery

4 Tested Tricks to Bypass iPhone Passcode, Don’t Miss!


1 Using Siri to Bypass iPhone Passcode

Siri enables you to avoid the iPhone passcode easily. You can follow these simple steps to using Siri to bypass iPhone passcode:

Step 1: Ensure that the proper iOS version is running on your iPhone. The bypass will not work properly if you are running iOS 9.3.

Step 2: Make sure that your iPhone is locked. Press down the home button for some minutes to activate Siri.

Step 3: Ask the time on the Siri. This will display a clock icon showing your local time zone.


Step 4: Click on the plus "+" symbol at the upper right-hand corner of the home screen.


Step 5: Insert some characters into the search bar. This search bar is displayed at the top of your home screen.

Step 6: Click and Hold the search button and release your finger. This will highlight your text.

Step 7: Click on the text again to “Copy” the text.

Step 8: Select the icon to the right of “Copy,” then “Share.” This will display a menu with many share options

Step 9: Click on the “Message” option. This will display a new message window.


Step 10: Click and press down the “To” field,” after “Paste.” The “To” option is displayed at the top of your screen.

Step 11: Wait for some seconds and press the home button. This will confirm that you have successfully bypassed the iPhone passcode.


2 Using iTunes to Bypass iPhone Passcode

iTunes is another alternative to erase and restore passcode on iPhone. Here are some detailed steps below to bypass iPhone passcode using iTunes technique:

Step 1: Connect your iPhone to the computer and open iTunes.

Step 2: Tap on the "Device" menu to open your iPhone tabs. Click on "Account" to locate the icon on your iPhone.

Step 3: Select "Back Up" option to make sure that your data is updated before restoring from a backup point.

Step 4: Click on "Restore iPhone" on your iTunes page and Tap on "Update" to confirm the process.

Step 5: Tap "Next" and click on "Agree" to begin the whole restoration process. Wait for some minutes to restore completely.

Step 6: Click on the restore icon from the "Restore backup" option to confirm if it is not your default option.

Step 7: Tap "Continue" to start restoring on your iPhone. This process can take up to 20 to 30 minutes.

Step 8: Swipe the Slide to unlock your iPhone home screen. This process will unlock your phone without entering a passcode.

Step 9: Insert your Apple ID password when required. This will help to restore the data on your phone.


3 Using iCloud to Bypass iPhone Passcode

If you are not able to access your iCloud account because you have forgotten your password or you purchase the iPhone from someone with a different password that is limiting you to iCloud feature, you can follow these simple steps to bypass passcode on your iPhone:

Step 1: Go to “Settings” and click on iCloud. You can click a random number if it requires your password. Click “OK” and “Cancel” if it indicates that your password is not correct.

Step 2: Go to the iCloud main page, open the account again, delete the description and press “OK.”

Step 3: The iCloud home page will display again, without requesting for password.

Step 4: Click on “Delete” to wipe out the iCloud data of the old user. After, you create your iCloud account.


4 Using Recovery Mode to Bypass iPhone Passcode

Recovery mode helps to erase data permanently and installs the latest version of iPhone device from scratch. For this technique, you will need the Apple ID and password used to set up the device.

Here are some steps below to restore iPhone from recovery mode:

Step 1: Press down the power button to switch off your phone

Step 2: Click and open iTunes on your computer

Step 3: Tap the Home button on your device, connect your iPhone to the computer with USB cable.

Step 4: The device will power up automatically in recovery mode if you follow the process.


Sponsor ads:

Gihosoft Free iPhone Data Recovery:https://www.gihosoft.com/iphone-data-recovery-free.html

Gihosoft iPhone Data Recovery Free

Free iPhone Data Recovery Software for Windows/Mac

Recover up to 12+ types of files, including contacts, SMS, photos, WhatsApp, Viber, notes, etc.

Restore lost data from iOS devices directly or from iTunes and iCloud backup

Recover iPhone data lost due to iOS upgrade/jailbreak, accidental deletion, device lost or broken

Support all the latest iPhone, iPad and iPod Touch

Both Free and Pro version.

If you lost data after you updated to a new iPhone, you can always use Gihosoft iPhone Data Recovery to get the data back from the old iPhone or backup.You may also like: iphonerecovery.com

If you use android phones, please choose Gihosoft Android Data Recovery.

With Gihosoft Android Data Recovery, no longer afraid of data loss!

Must read:Youtube video downloader for pc

Gihosoft RePicvid Free Photo Recovery Software provides a free photo recovery software for windows to help users recover the deleted or lost photo for free.

Jihosoft Android Data Recovery: the best Android Data Recovery software for Windows and Mac to recover deleted contacts, messages, photos, videos, WhatsApp and etc from Android devices.Tips:How to transfer messages from iPhone to iPhone

jihosoft Free iPhone Data Recovery

iOS 12 Adds Business Chat to Chat Directly with Business


Business chat feature is coming with Apple’s next iPhone operating system update iOS 12 this spring. Through iMessage app on an iOS 12 iPhone, users can directly chat with select business including Wells Fargo, Lowe's, Hilton and Discover.

Things get easier with the feature when it comes to interact with some business. The chat with business directly makes appointment scheduling, purchase making, air ticket booking, etc. in a convenient way within iMessage app. Moreover, personal information will not be exposed during chatting with businesses, and conversation can be ended at any time.Read Next:best slideshow app for android
Read Next:anilinkz


Part 1: Three Reasons That You Should Give Business Chat a Try


Part 2: 100% Delete and Erase Messages after Business Chat in iPhone
Three Reasons That You Should Give Business Chat a Try
1. Convenient Communication Method

No need to look up business phone number and waste time in speaking to irrelevant people; during chatting with business within Message app, you can do other task as well. It is fun, isn’t it? After updating to iOS 12, users can make an appointment with doctor in an easy way, and payment making within Message app with Apple Pay can be realized as well.


2. Won't Expose Personal Information

Living in a world where private information leakage is very common, people have to take personal information safety as the top priority. Chatting directly with business in upcoming iOS 12 can guarantee no personal information will be exposed as Apple commits that it won’t share users’ contact information with businesses. Furthermore, users can end the chat whenever they want to.


3. Doesn't Require Extra Downloads and Account Login

As is known to many social network users, Facebook is aiming to make its Messenger app as a consumer support channel enabling businesses to interact with customers, similar to iOS 12 Business Chat. In comparison, Apple takes advantage in that the feature can be realized with iPhone’s preinstalled Message app, which means there is no need to download extra program and log in some accounts.


With iOS 12 on your iPhone, users will find interaction with businesses of different sizes convenient. So far, businesses confirmed to use the feature include Wells Fargo, Lowe's, Hilton and Discover. According to Apple Inc., many more are going to employ the feature in the near feature.

Personal information, as we mentioned before, will not be exposed during chatting with businesses. However, some people want to completely delete and erase messages to better protect personal information. They may just delete messages from Message app. The method is not safe enough as messages deleted in this way can be recovered by some iOS data recovering tools. Therefore, to 100% delete and erase messages from your iPhone, an iOS data eraser is necessary. Here we focus on iMyFone Umate Pro.
100% Delete and Erase Messages after Business Chat in iPhone

With iMyFone Umate Pro, users are able to completely delete and erase messages after business chat in iPhone running iOS 12, and there is zero chance for data recovery. The computer-based program is well compatible with iOS 12, thus your iOS 12 iPhone will not encounter incompatibility issue. The program is available in Windows and Mac version. Please select one based on your computer system and then start to delete and erase messages from your iPhone.Sponsor ads:

Gihosoft Free iPhone Data Recovery:https://www.gihosoft.com/iphone-data-recovery-free.html

Gihosoft iPhone Data Recovery Free

Free iPhone Data Recovery Software for Windows/Mac

Recover up to 12+ types of files, including contacts, SMS, photos, WhatsApp, Viber, notes, etc.

Restore lost data from iOS devices directly or from iTunes and iCloud backup

Recover iPhone data lost due to iOS upgrade/jailbreak, accidental deletion, device lost or broken

Support all the latest iPhone, iPad and iPod Touch

Both Free and Pro version.

If you lost data after you updated to a new iPhone, you can always use Gihosoft iPhone Data Recovery to get the data back from the old iPhone or backup.You may also like: iphonerecovery.com

If you use android phones, please choose Gihosoft Android Data Recovery.

With Gihosoft Android Data Recovery, no longer afraid of data loss!

Must read:Youtube video downloader for pc

Gihosoft RePicvid Free Photo Recovery Software provides a free photo recovery software for windows to help users recover the deleted or lost photo for free.

Jihosoft Android Data Recovery: the best Android Data Recovery software for Windows and Mac to recover deleted contacts, messages, photos, videos, WhatsApp and etc from Android devices.Tips:How to transfer messages from iPhone to iPhone

jihosoft Free iPhone Data Recovery

Tuesday, February 26, 2019

Fix iTunes Error 9 When Updating to iOS 12


1. The Official Method

According to Apple’s instructions, you should try updating your iDevice again to fix iTunes Error 9.Also Read:Anonymous Apps to Chat with Strangers on iPhone

Follow these instructions:

Step 1: Make sure you have the latest version of iTunes installed. If not, then update it first.

Step 2: Force restart your iDevice and then connect it to your computer via USB cable.

Step 3: After successful connection, iTunes will ask you to update or restore your connected iDevice. Select the Update option to proceed. iOS 12 will be reinstalled, keeping your data intact.


If the above method doesn’t work, then you can try this:

Retry all the above mentioned steps but when iTunes asks you to update or restore select the Restore option this time. If your device is restored, then you will be able to set up your device from a backup.
3. Check USB Port and Cable

Make sure that the USB cable is properly connected to your iDevice and there is no loose connection. Also disconnect other USB cables from your computer expect for mouse and keyboard, and then reconnect your iDevice. If it doesn’t work, try a new cable.


4. Check Firewall and Anti-Virus

In order to complete the sync and update job, iTunes requires proper access to its network servers, and your anti-virus may mark iTunes as a malware program because of this reason. Therefore, it is recommended that you make sure that iTunes is whitelisted in your computer’s firewall as well as set as exception in your anti-virus.


5. Clearing iPhone/iPad Caches, Cookies, and Histories

iTunes error 9 may also occur if the junk files generated by Webmail, Browsing, and Safari on your iPhone are not cleared out. Clearing these will not only make your device faster but there is also a chance that the error 9 will be fixed.Fix Windows 10/8 100% Disk Usage with 5 Methods 2019

Here’s how to do this:

Launch Settings app on your iDevice and navigate to Safari and then select Clear History and Website Data from the list of options.


6. Erase All Content and Settings

iTunes error 9 is also sometimes fixed by erasing all content and settings on your iDevice. It is recommended that you back up all your iDevice data before attempting this fix.
Gihosoft Free iPhone Data Recovery:iphonerecovery.com
Follow these instructions:

Launch Settings app on your iDevice and navigate to General>Reset and then select Erase all content and settings option.


Bypass iTunes Error 9 via Using iTunes Alternative

Fix Common iMessage Problems?


Part 1: Common Fixes for iMessage Issues

Immediately after updating your iOS or during usage, it is often common for users to encounter issues with various applications, some of the preliminary lines of actions are the following:


Confirm that iMessage is not working for all your contacts, be sure the app is not connecting to all contacts, thus affirming the generalization of the issue.


Confirm your Wi-Fi connection: iMessage was designed to function via the internet, therefore it is crucial your gadget is connected before using the app.


Check iMessage functionality status: As is commonly experienced with all web-based services, it is possible the service provider is experiencing difficulties, affirm this via checking the Apple support website on (https://www.apple.com/uk/support/systemstatus/).


Check for relevant iPhone updates; given the frequency of debugging and fixing software by manufacturers. It is critical to always have the latest version of iMessage to avoid any fixed glitch.


Confirm Time and Date: In addition, go to settings and confirm the devices time and date, for improved accuracy, it might be needful to switch the Auto-Set option on.


Delete irrelevant conversations: If none of the above fixes eliminate the error, it is recommended you delete all irrelevant messages in iMessage by swiping left. This, however, should be a last resort when all first-line fixes fail to work.

If none of these work, it is needful to follow the below solutions:
Part 2: Fix iMessage Waiting for Activation


When your iPhone displays iMessage Waiting for Activation error, try the following:


Step 1.Go to (Settings > Message > iMessage).


Step 2.Returning to the settings page, switch off the Facetime option. At the top of Settings, click on the Airplane Mode, thereafter switch on the Wi-Fi.


Step 3.Switch on iMessage and thereafter, switch off Airplane mode; a message should appear stating that your carrier may charge for SMS click OK.


Step 4.If not, repeat the iMessage, Facetime, "off and on" procedure before you wait a while for its activation.
Part 3: Fix iMessage not Receiving Messages

This does not allow users to receive updates or messages from contacts on iMessage on wither the iPhone, iPad and iPod touch. If you have the same issue, try this fix:


Step 1.Reset your iPhone or iPad. Turn off LTE or set it for data only mode.


Step 2.Reset network settings: (Settings > General > Reset > Reset network settings).
Part 4: Resolve iMessage not Delivering


You could be in the other class of users that experience their messages not delivering to all contacts. Try this fix:


Step 1.Confirm your internet connection (Wi-Fi or 3G/4G network). In iMessage, tap the "!" alert option and retry sending.


Step 2.Switch iMessage off and turn it back on (Settings > Message > Turn off and turn on iMessage). Reboot your device.
Part 5: Fix iMessage Features/Effects not Working


With the escalating number of features created for iMessage since iOS, it is not uncommon to have various components malfunctioning, thus leading to the error message “iMessage Features/Effects not Working”. If you experience this, try this solution in order of increasing severity:


Step 1.Disable Reduce Motion (Settings > General > Accessibility > Reduce Motion > Tap to turn off).Also Read:Fix iTunes Error 1671 When Updating iPhone/iPad


Step 2.Turn off iMessage and then turn it on (Settings > Messages > iMessage > Tap to turn off > Turn on).


Step 3.Is iMessage not sending messages from your phone number? Confirm this (Settings > Messages > Send & Receive > Select your phone number in the column of "Start New Conversation From").


Step 4.Disable 3D Touch and try again (Settings > General > Accessibility > 3D Touch > Tap to turn off).Sponsor ads:Windows 10 Go Back to An Earlier Build Missing after 10 Days
Part 6: Retrieve Lost iMessages


Sponsor ads:

Gihosoft Free iPhone Data Recovery:https://www.gihosoft.com/iphone-data-recovery-free.html

Gihosoft iPhone Data Recovery Free

Free iPhone Data Recovery Software for Windows/Mac

Recover up to 12+ types of files, including contacts, SMS, photos, WhatsApp, Viber, notes, etc.

Restore lost data from iOS devices directly or from iTunes and iCloud backup

Recover iPhone data lost due to iOS upgrade/jailbreak, accidental deletion, device lost or broken

Support all the latest iPhone, iPad and iPod Touch

Both Free and Pro version.

If you lost data after you updated to a new iPhone, you can always use Gihosoft iPhone Data Recovery to get the data back from the old iPhone or backup.You may also like: iphonerecovery.com

If you use android phones, please choose Gihosoft Android Data Recovery.

With Gihosoft Android Data Recovery, no longer afraid of data loss!

Must read:Youtube video downloader for pc

Gihosoft RePicvid Free Photo Recovery Software provides a free photo recovery software for windows to help users recover the deleted or lost photo for free.

Jihosoft Android Data Recovery: the best Android Data Recovery software for Windows and Mac to recover deleted contacts, messages, photos, videos, WhatsApp and etc from Android devices.Tips:How to transfer messages from iPhone to iPhone


jihosoft Free iPhone Data Recovery

Top 5 Free Websites to Download Movies for iPhone 2019


1. Top 5 Free Websites to Download Movies for iPhone

Below we have detailed some of the best and legal websites that allow you to download movies to your computer, which you can then transfer over to your iPhone and watch on-the-go. Download free movies from these websites first, and follow the next part to move the movie to your iPhone.
Top 1: Crackle

Crackle is an online streaming service created by Sony. From this website, you’re able to browse all of their free content which you don’t have to pay for. Some of the content is available for download, although not all of it is.


Top 2: MoviesFoundOnline

This website has more than the other websites to offer – movies such as The Grudge 2, Chris and Jack, and Now You See it can be watched. Some of the videos from this website are hosted on YouTube, making it possible to download them.


Top 3: PopcornFlix

Next, PopcornFlix – not to be confused with PopCorn Time, another streaming platform – is a great website to watch movies on. While you aren’t able to download movies, they have a wide selection of foreign, animation, and thriller movies.


Top 4: Hulu

Unfortunately, Hulu hasn't yet added a download feature for their content although there are a few different Hulu converters out there. If you find a Hulu video that you want to download, use one of these websites.


Top 5: YouTube

Recently, YouTube Have added the ability to download YouTube videos through their mobile app and if you have purchased a movie from YouTube, you can use the app to download it on your iPhone. While YouTube doesn't allow you to download movies on a computer, you can use a YouTube converter to do so.Sponsor ads:Avoid Toll Roads in Apple Maps and Google Maps


Sponsor ads:

Gihosoft Free iPhone Data Recovery:https://www.gihosoft.com/iphone-data-recovery-free.html

Gihosoft iPhone Data Recovery Free

Free iPhone Data Recovery Software for Windows/Mac

Recover up to 12+ types of files, including contacts, SMS, photos, WhatsApp, Viber, notes, etc.

Restore lost data from iOS devices directly or from iTunes and iCloud backup

Recover iPhone data lost due to iOS upgrade/jailbreak, accidental deletion, device lost or broken

Support all the latest iPhone, iPad and iPod Touch

Both Free and Pro version.

If you lost data after you updated to a new iPhone, you can always use Gihosoft iPhone Data Recovery to get the data back from the old iPhone or backup.You may also like: iphonerecovery.com

If you use android phones, please choose Gihosoft Android Data Recovery.

With Gihosoft Android Data Recovery, no longer afraid of data loss!

Must read:Youtube video downloader for pc

Gihosoft RePicvid Free Photo Recovery Software provides a free photo recovery software for windows to help users recover the deleted or lost photo for free.

Jihosoft Android Data Recovery: the best Android Data Recovery software for Windows and Mac to recover deleted contacts, messages, photos, videos, WhatsApp and etc from Android devices.Tips:How to transfer messages from iPhone to iPhone

jihosoft Free iPhone Data Recovery

Monday, February 25, 2019

Add Voice Memos to iTunes using iTunes


1. Add Voice Memos to iTunes using iTunes

You can also simply transfer the voice memos to iTunes using iTunes itself. The following is how to go about doing that.

Step 1: Download and install iTunes on your computer. If you already have iTunes on your computer, check to ensure that you are using the latest version of iTunes.

Step 2: Connect the iPhone/iPod to your computer and then launch iTunes.

Step 3: Click on the device button at the top left of the window.

Step 4: Select the Music tab and then select “Include Voice Memos.” Click Apply and the voice memos will sync to iTunes.


The voice memos will be stored in a folder named “Voice Memos” within iTunes. You can view them in the Voice memo playlist under the Playlists menu in iTunes.Sponsor ads:

Gihosoft Free iPhone Data Recovery:https://www.gihosoft.com/iphone-data-recovery-free.html

Gihosoft iPhone Data Recovery Free

Free iPhone Data Recovery Software for Windows/Mac

Recover up to 12+ types of files, including contacts, SMS, photos, WhatsApp, Viber, notes, etc.

Restore lost data from iOS devices directly or from iTunes and iCloud backup

Recover iPhone data lost due to iOS upgrade/jailbreak, accidental deletion, device lost or broken

Support all the latest iPhone, iPad and iPod Touch

Both Free and Pro version.

If you lost data after you updated to a new iPhone, you can always use Gihosoft iPhone Data Recovery to get the data back from the old iPhone or backup.You may also like: iphonerecovery.com

If you use android phones, please choose Gihosoft Android Data Recovery.

With Gihosoft Android Data Recovery, no longer afraid of data loss!

Must read:Youtube video downloader for pc

Gihosoft RePicvid Free Photo Recovery Software provides a free photo recovery software for windows to help users recover the deleted or lost photo for free.

Jihosoft Android Data Recovery: the best Android Data Recovery software for Windows and Mac to recover deleted contacts, messages, photos, videos, WhatsApp and etc from Android devices.Tips:How to transfer messages from iPhone to iPhone

jihosoft Free iPhone Data Recovery

Unlock iPhone iOS 12 Passcode with Synced iTunes 2019


Unlock iPhone iOS 12 Passcode with Synced iTunes

If you have ever synced your iPhone with iTunes previously, then you can use iTunes to restore your device and unlock iPhone passcode. To use iTunes users can follow these simple steps.

Step 1: Connect your device to the Mac or PC that you have synced your device with using a USB cable.

Step 2: Launch the iTunes, and if asked to enter your passcode or trust this computer, try another computer you have synced with or use iMyFone LockWiper instead.

Step 3: iTunes will sync your iPhone and make a backup.

Step 4: After that, click “Restore iPhone...” and confirm it.


Step 5: When your iPhone comes to the Set-Up screen, tap "Restore from iTunes backup".


Step 6: On your iTunes, select your iPhone and select the latest backup. Then, just wait for iPhone to finish the setup.


Important Things of This Method: If your iPhone is running on iOS 11.4.1 or later, this way only works when USB Accessoriesis enabled. You can find this setting in "Settings > Face ID & Passcode/Touch ID & Passcode". In general it's disabled by default.
Unlock iPhone iOS 12 Passcode Remotely via iCloud

Apart from the above two ways, you can still use iCloud to unlock your iPhone without passcode.

But this way works only when these requirements are satisfied:


Your iPhone should be linked to an iCloud account and have "Find My iPhone" enabled.


Your must know the Apple ID and password of the iCloud account that your iPhone is linked to.


Your iPhone must have internet to ensure this remote erasure can be done.

If these requirements are well satisfied, follow these steps to operate it:

Step 1: On another mobile phone or on your computer, open a web browser and go to icloud.com.

Step 2: Log in with your Apple ID and password.

Step 3: On the next page, click on "Find iPhone".


Step 4: You will see the map on the next page, click All Devices at the top and select the iPhone you want to unlock.

Step 5: Click "Erase iPhone" and confirm this operation. Your iPhone will be remotely erased and the passcde will be removed.


These methods to unlock iPhone passcode is easy to follow. The most important thing is selecting the right way, or you will waste your time. In general, if you've synced your iPhone with iTunes, it's suggested to use iTunes. If not, using iMyFone LockWiper is the most recommended way because it works for any situation. Finally, choose iCloud method if your iPhone connect to internet and has "Find My iPhone" enabled.Sponsor ads:Windows Media Player Won’t Play AVI Troubleshooting

Hоw tо Trаnѕfеr Muѕiс bеtwееn iPhоnеѕ 2019


Hоw tо Trаnѕfеr Muѕiс bеtwееn iPhоnеѕ viа iTunes Home Sharing

1. Gо tо Settings, select Muѕiс оr Vidеоѕ.

2. Scroll dоwn to the hеаding аnd ѕеlесt home ѕhаring.

3. Tар ѕign in, enter уоur Aррlе ID аnd password. Use thе ѕаmе Apple ID fоr еvеrу соmрutеr оr dеviсе on your Hоmе Sharing network.

4. Go back to your music app after setting up the Home Sharing, select the library, you will see the home sharing option.

5. If there is no home sharing option, tap on edit, you will see it, and then select to start sharing.


3 Hоw do I Trаnѕfеr Music between iPhоnеs viа iTunеѕ Stоrе

1. Cоnnесt уоur dеviсе tо уоur соmрutеr.

2. Oреn iTunеѕ. Mаkе ѕurе that you hаvе thе lаtеѕt vеrѕiоn.

3. Chооѕе thе соntеnt that you want tо аdd tо your device frоm уоur iTunеѕ library.

4. Lооk in the lеft ѕidеbаr for уоur dеviсе; drаg thе content tо уоur iPhone, iPаd, оr iPоd.


4 Hоw tо Trаnѕfеr Muѕiс bеtwееn iPhоnеѕ viа AirDrор

1. Kеер Bluеtооth аnd Wi-Fi оn if уоu wаnt tо use Airdrор tо ѕhаrе muѕiс

2. Lаunсh thе muѕiс App.

3. Tap оn New tаb аnd then nаvigаtе tо уоur favorite ѕоng

4. Select more option at right-bоttоm side оf the iPhоnе ѕсrееn аnd tap on it

5. Sеlесt Shаrе SоngSponsor ads:Windows 10 Go Back to An Earlier Build Missing after 10 Days
Sponsor ads:Top 7 Websites to Stream Your Favorite Christmas Movies in 2018


5 How to Transfer Music between iPhones via iCloud Family Sharing

1. Go tо Sеttingѕ ѕеlесt iClоud, Fаmilу аnd аdd Family Mеmbеr.

2. Entеr your family mеmbеr'ѕ nаmе or еmаil аddrеѕѕ. Sее if your family member ассерtеd thе invitаtiоn, then START SHARING.

3. Shаrе fаmilу рhоtоѕ and vidеоѕ. Oреn the Phоtоѕ app, tap Fаmilу in the Shared tab, аnd аdd whаt уоu wаnt to ѕhаrе.


Yоu can have уоur devises реrfоrm tо the mаximum capacity if уоu choose tо. Choose TunеѕMаtе tо еnjоу your dеviсеѕ аnd ѕhаrе with family and friends.

Sunday, February 24, 2019

Apple Shares 4New iPhone Photography Tutorial Videos


Apple enjoys tutorial videos, especially those that aim to help people get the most out of the cameras in their iPhones.

As such, the company semi-regularly uploads new tutorial videos to its YouTube channel. Today sees the addition of a quartet of new content, all meant to help get iPhone owners a bit more out of their smartphone’s camera. The first of the bunch shows off how to shoot a time-lapse video, while the others focus on the rule of thirds, how to trim a video, and how to shoot with light and shadow.

The videos are below:

Each of the videos measures in at 40 seconds. They are quick and to the point, but, for as short as they are can certainly be helpful enough. The last time Apple uploaded tutorial videos was earlier this month, when the company shared how to manage depth control and more.

Are you happy with the cameras in the latest iPhones? Based on the results from DxoMark earlier today and the Samsung Galaxy S10, sounds like there is definitely fresh competition coming to the market.

[via Apple (YouTube)]
Sponsor ads:Check Who Viewed Your Facebook Profile?


Sponsor ads:Find Songs by Humming Online with Web/Mobile Apps

Friday, February 22, 2019

How to Restore iTunes Data from Computer to iPhone, iPad or iPod touch? 2019 Guide


There are common situations that can prompt an iPhone, iPad or iPod touch user to restore their iTunes data from computer to their device. Firstly, when they lose their data on device but they have backed up the data to iTunes before. The second problem is that their iOS device is misplaced or upgraded to new one and they want to restore iTunes data to the new device. And the article will show you two ways to restore iTunes data from computer to your iPhone, no matter it is an old or new one.
In the first instance, let’s discuss what iTunes can do for a user. Apple’s iTunes was originally developed to help user transfer data to their devices (iPhone, iPad and iPod). You can also use it to restore purchased files or old backup from computer to iOS device without hassle. How to do it? See the following part.Sponsor ads:how to remove cydia


Restore iTunes Data from Computer to iPhone by iTunes Itself

Apple has considerately offered the steps telling how to restore data from iTunes on computer to iOS devices. See the following specific procedures.

1. Open iTunes on your Mac or Windows PC that you used in backing up your device.

2. After that, connect your device to your computer with a USB cable. If a pop-up window appears asking you should enter your passcode or trust this computer, follow the prompt.

3.Select your iPhone, iPad or iPod when it appears in the iTunes. If your device doesn’t appear in iTunes then follow this step;


Ensure that you have the latest version of iTunes that works with your computer operating system.


Try each USB port on your computer to confirm is any is not faulty then try a different Apple USB cable.


Restart your computer and your iPhone, iPad or iPod touch.

4. Select Restore Backup…from the Backups option on the window. If any pop up appears that your iOS device software is too old. Try to upgrade it and try again from the beginning.

5. After all the above steps have been done correctly, iTunes will show all the previous backups with date and size. Look at each of the backup histories carefully and pick the one with the most relevant one.

6. After picking the most relevant backup then, click on the Restore and wait for the restore time to be completed, if asked to enter the passcode, enter your password for your encrypted backup.

7. Make sure your device is still connected to your Mac or Windows PC till it restarts automatically and wait for sync with your computer after the sync you can disconnect your device from your pc. Restart it and you have all your previous media, data and settings back on your device.


But iTunes goes wrong often. Lots of Apple users ask for help online saying that they cannot restore the iTunes data from computer to iPhone due to the iTunes’ system error. So it is necessary that we have an alternative of iTunes to restore the old backup to iOS devices. And the following will introduce a free tool which can help you do this.Sponsor ads:

Gihosoft Free iPhone Data Recovery:https://www.gihosoft.com/iphone-data-recovery-free.html

Gihosoft iPhone Data Recovery Free

Free iPhone Data Recovery Software for Windows/Mac

Recover up to 12+ types of files, including contacts, SMS, photos, WhatsApp, Viber, notes, etc.

Restore lost data from iOS devices directly or from iTunes and iCloud backup

Recover iPhone data lost due to iOS upgrade/jailbreak, accidental deletion, device lost or broken

Support all the latest iPhone, iPad and iPod Touch

Both Free and Pro version.

If you lost data after you updated to a new iPhone, you can always use Gihosoft iPhone Data Recovery to get the data back from the old iPhone or backup.You may also like: iphonerecovery.com

If you use android phones, please choose Gihosoft Android Data Recovery.

With Gihosoft Android Data Recovery, no longer afraid of data loss!

Must read:Youtube video downloader for pc

Gihosoft RePicvid Free Photo Recovery Software provides a free photo recovery software for windows to help users recover the deleted or lost photo for free.

Jihosoft Android Data Recovery: the best Android Data Recovery software for Windows and Mac to recover deleted contacts, messages, photos, videos, WhatsApp and etc from Android devices.Tips:How to transfer messages from iPhone to iPhone

jihosoft Free iPhone Data Recovery

Wednesday, February 20, 2019

How to Back Up iPhone Notes without iTunes 2019


Back Up iPhone Notes to iCloud

iPhone, like all iOS devices, depends on iCloud to back up data on it. The following steps will back up your iPhone notes to iCloud.


Open Settings and choose iCloud on your iPhone, sign in to iCloud accont using your Apple ID and passcode.


Enable the toggle button of "Notes" to activate iCloud to automatically back up your notes.


On your PC/Mac, install iCloud and sign in using your same iCloud account. Then you can check your iPhone notes on the computer.


Back Up iPhone Notes via Email

You can manually send notes to yourself using the Email service. Without better tool, achieving this feature might be a little toilsome if you have too many notes to back up, but this method is free and you can send your notes to yourself anytime you want. See the steps below:


Start the Notes app on your iPhone.


Choose note and tap the share icon and choose *Mail*.


Enter your email address in the receiver's box and *Send*


Go to your email account on your computer to access and download the notes you just sent to your email.


iOS data management used to be a challenging task before the advent of tools to help with various functions of iPhone and its sibling products. Sponsor ads:Offline Music Apps for iPhone

Must Read:If you lost data after you updated to a new iPhone, you can always use Gihosoft iPhone Data Recovery to get the data back from the old iPhone or backup.

Gihosoft Free iPhone Data Recovery:iphonerecovery.com

If you use android phones, please choose Gihosoft Android Data Recovery

Tuesday, February 19, 2019

SnapChat is Actually A Most Enjoyable App 2019


SnapChat on iPhone is actually a most fun gathering app. And it has attracted 70% people of the total active peoples on iOS. However, it has developed more audience on iOS. SnapChat App iPhone is one of those Apps who can connect you to all over the world’s life and you can broadcast live to them.

It is not as, that SnapChat only works with snaps sharing. But it makes fun with snaps and you can put your texts, emoticons and other stickers on snaps.
Mostly Attract on SnapChat Features

1. Share Pictures and videos and both will self-destruct after few seconds of view status.

2. Put special texts captions.

3. Draw with pretty highlighted and cultural colors.

4. Set time limits on snaps to be active.

5. Most new feature available for US peoples and that is you can pay to your friends or pay for a purchase and totally secure with Snapcash launched in 2014.

6. Add anything like, location filters, whether filters or time filters.

7. Discover others stories and watch what’s happing around the world

8. Amazing fun filters that can make your conversation with full of fun.


How to Use SnapChat on iPhone?

Step 1. Find in the App store SnapChat and install it in your device.

Step 2. Create your account by signing up and all you need is your email address, a password and tell your birthday,

Step 3. Select a unique username that will define your name or identity on SnapChat on iPhone.

Step 4. Join interesting people, showing on front screen in SnapChat.

Step 5. Share photo or videos clips to your contacts.

Step 6. Tap to take a snap and hold for video clip.

Step 7. Final step is to editing or decorating your photo or clips with fun filters.


Some Secret Tricks to use SnapChat
1Recording videos without using your fingers

You can record videos and without holding the push button as described above. You can do it by making a gesture upon your choice by going to the general setting. Once you are in general setting, click to the accessibility option and then choose assistiveTouch. It will show you a white dott appearing on your screen. After it toggles to go next to assistiveTouch and then click on New Gesture. Here you will do same as before tap and hold for the video clip. Once you recorded the video then save and send it. Now you have done with making your gesture. For next always you just need to drag and put that tiny white circle in capture cell. And then you can record videos without using your fingers.
2Save your text messages upon your interest.

The second amazing trick is to save your messages. As all iPhone users well know that your text messages will self-destruct once after being viewed. But you can save them by selecting by long press on message and then click to save. And they will filter to save messages.

Sponsor ads:

Gihosoft Free iPhone Data Recovery:iphonerecovery.com

Free iPhone Data Recovery Software for Windows/Mac

Recover up to 12+ types of files, including contacts, SMS, photos, WhatsApp, Viber, notes, etc.

Restore lost data from iOS devices directly or from iTunes and iCloud backup

Recover iPhone data lost due to iOS upgrade/jailbreak, accidental deletion, device lost or broken

Support all the latest iPhone, iPad and iPod Touch

Both Free and Pro version.

If you lost data after you updated to a new iPhone, you can always use Gihosoft iPhone Data Recovery to get the data back from the old iPhone or backup.

Top 10 Best FRP Bypass Tools to Bypass Google Account on Android Device 2019

Worth reading:download youtube 1080p

If you use android phones, please choose Gihosoft Android Data Recovery


Jihosoft Android Data Recovery: the best Android Data Recovery software for Windows and Mac to recover deleted contacts, messages, photos, videos, WhatsApp and etc from Android

Friday, February 1, 2019

Fix iOS Update Won t install


Just recently, Apple has introduced the iOS 12.1.3 update for all its iOS users. The new update is aimed to deliver more secured, responsive and faster user experience. For this reason, the users are briskly updating their iDevices to iOS 12.1.3. But unfavorably, some of them find iOS update won t install, which has been reported in many forums. Now, if you're also one of those whose iOS update won t install, fret not! We've got your back! Today's post if specifically tailored to help you get through this situation and how to successfully get your iOS update installed. Keep reading!


1. What Problems You May Meet When iOS Update Won't Install


2. What Can You Do When iPhone Restore Is Stuck?


2.1. Make Sure Your iPhone Has Enough Free Storage


2.2. Force Restart iPhone


2.3. Make Sure Your Wi-Fi Network Works Well


2.4. Use a Tool to Update iPhone
1. The Problems You May Meet When iOS Update Won't Install

First, let's get to know about what sort of problems that you may encounter when iOS update won t install. Below mentioned some of the problems that you may experience.


iPhone stuck on Verifying Update: Right after the iOS download gets completed, it verifies the update files and this is where you may get stuck with a pop up that reads 'Verifying update...'.


iPhone stuck on Apple logo: You may also witness a situation where your iPhone may get stuck on Apple logo screen while rebooting.


iPhone stuck on black screen with spinning wheel


iPhone stuck on installing software: The installation process seems to be never ending or isn't progressing even a bit? Well, your iOS update won t install as it got stuck.


Also, you may witness other error messages that halts iOS update installation. It's now time to understand the methods that bring the odds to get through the update process, the next time.
2. What You Can Do When iOS Update Won't Install
2.1. Make Sure Your iPhone Has Enough Free Storage

The most common reason that your iOS update won t install is due to the fact that there isn't enough storage space available over your iPhone. To resolve this, you need to first check the size of update file. Then you need to ensure that enough of the storage space is available for the update file to download and then install the update. Preferably, the available space should be the double of the update file size.


To check update file size: navigate through into 'Settings' > 'General' > 'Software Update' > you'll get to see the file size under the iOS version.


To check iPhone storage: get into 'Settings' > 'General' > 'iPhone Storage' > you can, here, view the storage space available over your iPhone.


Note: In case, you find that the enough storage space isn't available, please free up the required amount of space and try initiating the update again.


2.2. Force Restart iPhone

In case you're stuck in middle and iOS update won t install or progress any further, then the next thing you can opt for is to force reboot your iPhone. Depending on the iPhone model you possess, follow the below mentioned tutorial to force reboot it.


For iPhone X/XS/XS Max/XR/8/8 plus:

Briefly push the 'Volume up' button, followed by 'Volume down' and then keep the 'Power' button down till the time Apple logo appears on your screen.


For iPhone 7/7plus variants:

Grasp the 'Volume down' and 'Power' key down altogether till you witness Apple logo appearing on your screen.


For iPhone 6/6s or older

Grasp the 'Home' key along with the 'Power' key down till you get to see Apple logo flashing up on your screen.


2.3. Make Sure Your Wi-Fi Network Works Well

At times, when you have enough storage space available over your iPhone and still the iOS update won t install, the reason behind it could be related to the network. Therefore, ensure that you are connected to a stable and high speed internet connection (a Wi-Fi, for instance) rather than a cellular data connection.


2.4. Use a Tool to Update iPhone

Sponsor ads:

Gihosoft Free iPhone Data Recovery:https://www.gihosoft.com/iphone-data-recovery-free.html

Gihosoft iPhone Data Recovery Free

Free iPhone Data Recovery Software for Windows/Mac

Recover up to 12+ types of files, including contacts, SMS, photos, WhatsApp, Viber, notes, etc.

Restore lost data from iOS devices directly or from iTunes and iCloud backup

Recover iPhone data lost due to iOS upgrade/jailbreak, accidental deletion, device lost or broken

Support all the latest iPhone, iPad and iPod Touch

Both Free and Pro version.

If you lost data after you updated to a new iPhone, you can always use Gihosoft iPhone Data Recovery to get the data back from the old iPhone or backup.You may also like: iphonerecovery.com

If you use android phones, please choose Gihosoft Android Data Recovery.

With Gihosoft Android Data Recovery, no longer afraid of data loss!

Must read:Youtube video downloader for pc

Gihosoft RePicvid Free Photo Recovery Software provides a free photo recovery software for windows to help users recover the deleted or lost photo for free.

Jihosoft Android Data Recovery: the best Android Data Recovery software for Windows and Mac to recover deleted contacts, messages, photos, videos, WhatsApp and etc from Android devices.Tips:How to transfer messages from iPhone to iPhone


jihosoft Free iPhone Data Recovery

Call of Duty: Mobile Now Available for Download for iPhone and Android

If you are a fan of battle royale games and first-person action shooters like PUBG and Fortnite, there’s a new game in town for you. Activis...